Now, take a good look at the model skeleton. It's symmetrical along all 3 axes. What this means is that we can make polyfaces for one quadrant of the model, and them mirror it to the rest.

For creating faces that have their points on polyline kinks, it's best to change a few things. First of all, take off "Snap" on the status bar. Next, check the "End" box in the OnSnap toolbar. This will snap the pointer to the kinks along the polylines. If you can't see the OnSnap toolbar, click on "OnSnap" in the status bar at bottom to display it.
We'll use the "Surface form 3 or 4 Corner Points" tool to actually create the faces. Each click will set the location of a corner point. Once you set 3 corner points you can right-click or press "Enter" to create a triangle, or left-click to set another corner point and make a 4-sided polygon. We'll be sticking with triangles; they stay flat.
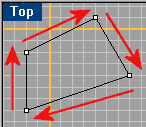
Rhino has a simple - but actually sometimes confusing - way of setting the normal of a surface. If you create the corner points of a triangle in a clockwise order, relative to your point of view, that surface will face away from you. Such an instance is shown in the picture to the right. Likewise, if you set up the points counter-clockwise, the surface will face in your direction.
Now, simply move the crosshairs close to one of the polyline kinks. The little point will attach itself to the kink. You can then click to set the first point. Do the same for the other 2 points, making sure that you do them in a counter-clockwise order. Of course, if you are looking "through" the model's skeleton and placing a surface on the other side,
I recommend checking that you got all the surfaces facing the right way via a preview render without "Render Backfaces" being active (Tools -> Options -> Render -> Render Backfaces). Make sure that you rotate the rendered view a few times as any holes that may appear could be from one of two reasons. One, you didn't create a polyface there. Or two, there is a polyface there, but it's normal is not the same as it's neighboring polyfaces. If the polyface has a flipped normal, you will see it appear and all the rest disappear as you rotate the view to the other side of the model. In such an instance you can select the backwards polyface and flip it's normals by right-clicking on this button:![]() .
.