| << Previous section | | | < Previous page | | | Home | | | Next page > | | | Next section >> |
You're probably wondering what mistake, right? Well, I'll be honest - it was not an intentional one. I really did make a mistake, without meaning to, and when I caught it I had already taken the screenshots for the previous page. So I decided to use the oppourtunity to show exactly why you should start off a model with a polyline skeleton.
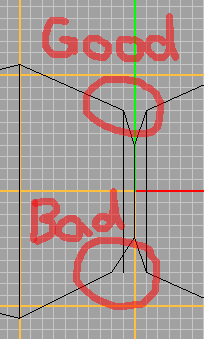
Well, here it is. When positioning the hourglass-like outline of the model from the top viewing port, I misplaced one of its "kinks", as Rhino refers to them. Call them corners, points, whatever... Do you see it? We need to reposition that kink without moving the rest of the line. Piece o' cake.
See this button? This will toggle the Edit Points mode for any selected polylines. Left-click turns it on, right-click turns it off. You can click on this button either before or after you've selected the polyline; if you click it before it will simply ask you to pick the line you want to turn Edit Points on for. Pick the polyline, and click the button. Walla!
You now see that the polyline has little squares, called points, every place it has a kink.
In the perspective viewport, right-drag the view around to make sure that the mistake is fixed, and also that no other mistakes snuck in on us. If you find any more, fix 'em the same way.
Now that we've got the basic shape down, let's start building faces. :)