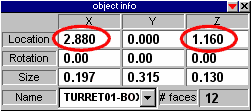
Now we need to reposition each turret light to the position of the corresponding turret-box. To view the exact position of a sub-object, right-click on the Object Tool. This will pop-up the Object Info box, which lists the XYZ position of the current object. However, TS is a bit tricky here. Because the object was imported, each object and sub-object has its axes at 0,0,0. And since the Object Info box lists the position of the object's axes, they are all shown as being positioned at 0,0,0.

Luckily, there is an easy fix. For each turret, select the turret## sub-object in TrueView, and click on the Center Axes button. This will move the axes of that sub-object to the geometric center of the object. Now, if you look in the Object Info box, you will see that the object is no longer listed as being at 0,0,0.
After you have repositioned all the turret axes, do the same for the turret##-box axes. Once these are done, we need to copy the non-zero values from each turret##-box to the respective local light, thereby reassigning the light to the same position as the box.
So, select the turret01-box. Down in the Object Info box, selct the X value and copy it with CTRL-C. Now select the local light that is grouped along with the turret01 sub-object. Select it's X value and press CTRL-V to replace it with the copied value. Do the same for each non-zero value in the turret01-box's Object Info box. In our example it should be the marked ones - X and Z. Once the light is positioned correctly, rename the light to turret01-fp and the group to turret01. This will tell POF CS that the light is to represent the firepoint of the turret.
Follow the same procedure for each light and it's corresponding box. In the end you should end up with one light at the tip of each turret, exactly in the center of the turret boxes. It may not look like the lights are in the center of the boxes if they're larger then the boxes, but if you followed directions it is. Double-check that all 4 lights are in position. If they are then we can delete the turret boxes as we won't be needing them anymore.
Oh yes, one more thing: move the light of the main hull to the center of the hull (or wherever you want it). It's default position when it's created is 0,0,1 - one square up. This may not seem like a big deal, but if/when you scale your model up, it'll just get exaggerated, and may cause unnessecary problems.

Now things should look like the picture to the left. Note that the local light of the hull object doesn't need to be named anything in particular, as the naming is only required for the auto-turret feature of POF CS.
Now, click on the flak_turret group at the top of the Hierarchy, and go to File -> Save As -> Object... Save the model as a COB somewhere where it won't get lost. We aren't finished yet, but it's always good to have backups.
| << Previous section | | | < Previous page | | | Home | | | Next page > | | | Next section >> |